The DS18B20 is a temperature sensor that can be used in various simple projects. This part uses the 1 wire (I2C) bus and you can connect multiple sensors up to your Arduino.
The DS18B20 digital thermometer provides 9-bit to 12-bit Celsius temperature measurements and has an alarm function with nonvolatile user programmable upper and lower trigger points. The DS18B20 communicates over a 1-Wire bus that by definition requires only one data line (and ground) for communication with a central microprocessor. It has an operating temperature range of 55°C to +125°C and is accurate to ±0.5° C over the range of 10°C to +85°C. In addition, the DS18B20 can derive power directly from the data line (“parasite power”), eliminating the need for an external power supply. Each DS18B20 has a unique 64 bit serial code, which allows multiple DS18B20s to function on the same 1 Wire bus.
The part is also relatively low cost and only requires an additional 4k7 pull up resistor. In the example below we shall make a basic example that reads the temperature and outputs via serial and can be verified using the serial monitor in the Arduino IDE.
Lets look at the parts list that you will need
Parts List
| Label | Part Type |
|---|---|
| DS1 | DS18B20 1-Wire Temperature Sensor |
| Part1 | Arduino Uno (Rev3) |
| R1 | 4.7k Ω Resistor |
Layout
As always be careful not to get the connections incorrect, you can refer to the pinout for the device below to help . The DS18B20 can be powered by between 3.0V and 5.5V so you can simply connect its GND pin to 0V and the VDD pin to +5V from the Arduino Uno.
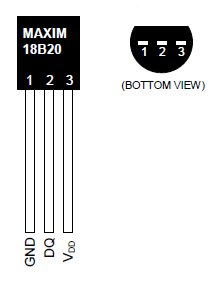
ds18b20 pinout
Here is the connection diagram showing how to connect your arduino to the resistor and sensor.
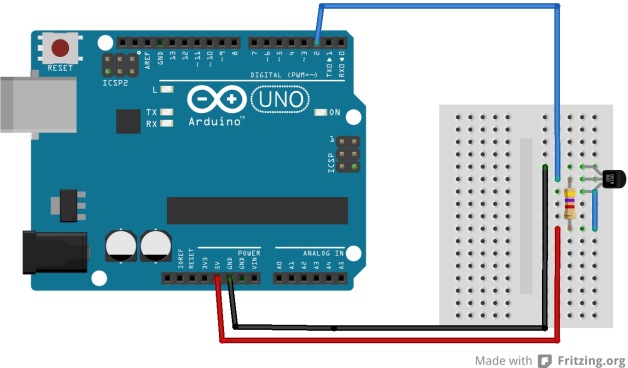
ds1820 breadboard layout
Coding
You need to download 2 libraries and copy them into your Arduino libraries folder.
Dallas 18b20 Temperature Library
“1-Wire” Library
Now copy and paste this into a new sketch
[codesyntax lang=”cpp”]
#include <OneWire.h>
#include <DallasTemperature.h>

//the pin you connect the ds18b20 to
#define DS18B20 2

OneWire ourWire(DS18B20);
DallasTemperature sensors(&ourWire);

void setup()
{
Serial.begin(9600);
delay(1000);
//start reading
sensors.begin();
}

void loop()
{
//read temperature and output via serial
sensors.requestTemperatures();
Serial.print(sensors.getTempCByIndex(0));
Serial.println(” degrees C”);
}
[/codesyntax]
When you upload the sketch, go to Tools -> Serial Monitor and you should see something like the following. Put your finger on the DS18B20 and you should see the temperature vary.
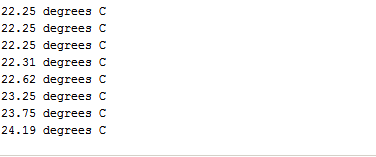
ds18b20 output
Links