This shield integrate various module functions and you can directly program to complete the experiment without welding and cables.
This shield can be fully compatible with the Arduino UNO R3 and it will never short circuit with the Arduino UNO USB interface, so this shield is very safe.
Details
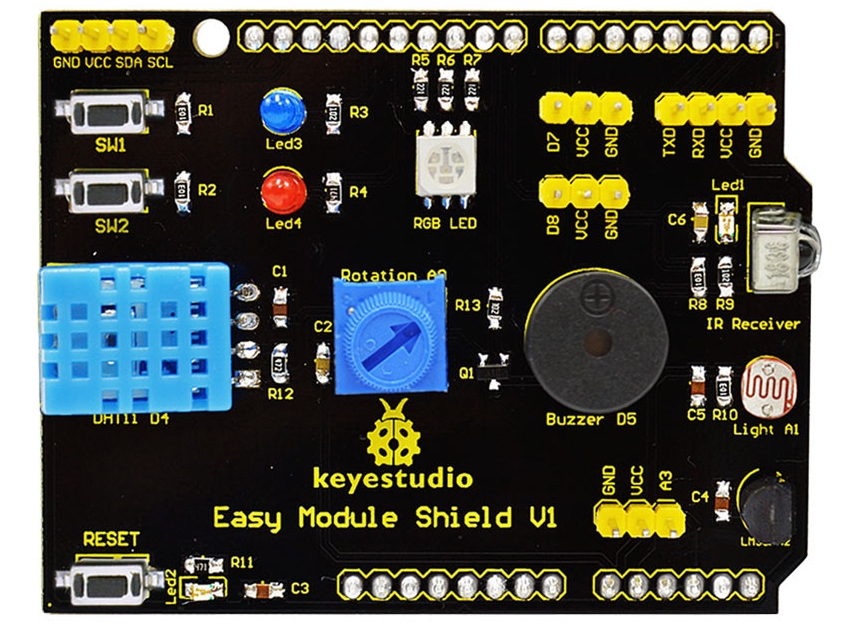
Model: Easy Module shield V1
You can see from the image below that there are many features, none of tehse are overly difficult to work with the LEDs connect to 2 digital pins, the potentiometer and ldr are connected to analog pins and so on
Board Features
The board has various features, these make it ideal for beginners who just want to plug in a shield and start coming up with various simple examples rather than dealing with cables, sensors and breadboards
1、Two channels key module
2、Two channels LED module
3、Full color LED module
4、Infrared receiving module
5、Luminance sensor module
6、LM35D temperature sensor module
7、Passive buzzer module
8、Rotate potentiometer module
9、DHT11 temperature and humidity sensor module
10、One I2C interface (A4 SDA, A5 SCL)
11、One TTL serial port
12、Two-way digital port (D7、D8)
13、Two channels analog ports (A3)
14、Reset button
Code
[codesyntax lang=”cpp”]
const int RED_PIN = 9;
const int GREEN_PIN = 10;
const int BLUE_PIN = 11;

void setup()
{
 pinMode(RED_PIN, OUTPUT);
 pinMode(GREEN_PIN, OUTPUT);
 pinMode(BLUE_PIN, OUTPUT);
}


void loop()
{
 cycleColors();
}


void cycleColors()
{
 // Off (all LEDs off):
 digitalWrite(RED_PIN, LOW);
 digitalWrite(GREEN_PIN, LOW);
 digitalWrite(BLUE_PIN, LOW);
 delay(1000);

 // Red (turn just the red LED on):
 digitalWrite(RED_PIN, HIGH);
 digitalWrite(GREEN_PIN, LOW);
 digitalWrite(BLUE_PIN, LOW);
 delay(1000);

 // Green (turn just the green LED on):
 digitalWrite(RED_PIN, LOW);
 digitalWrite(GREEN_PIN, HIGH);
 digitalWrite(BLUE_PIN, LOW);
 delay(1000);

 // Blue (turn just the blue LED on):
 digitalWrite(RED_PIN, LOW);
 digitalWrite(GREEN_PIN, LOW);
 digitalWrite(BLUE_PIN, HIGH);
 delay(1000);

 // Yellow
 digitalWrite(RED_PIN, HIGH);
 digitalWrite(GREEN_PIN, HIGH);
 digitalWrite(BLUE_PIN, LOW);
 delay(1000);

 // Cyan
 digitalWrite(RED_PIN, LOW);
 digitalWrite(GREEN_PIN, HIGH);
 digitalWrite(BLUE_PIN, HIGH);
 delay(1000);

 // Purple
 digitalWrite(RED_PIN, HIGH);
 digitalWrite(GREEN_PIN, LOW);
 digitalWrite(BLUE_PIN, HIGH);
 delay(1000);

 // White
 digitalWrite(RED_PIN, HIGH);
 digitalWrite(GREEN_PIN, HIGH);
 digitalWrite(BLUE_PIN, HIGH);
 delay(1000);
}
[/codesyntax]
Links
The shield comes in at about $8
keyestudio Multi-purpose Shield V1 for arduino starter