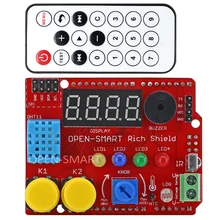
This Rich Shield for the Arduino has many useful components onboard such as LED’s, buttons and a buzzer. It is easy and great for learning arduino development and programming
This is the shield with a little remote control, in this article we focus on the DHT11 sensor (the blue one) and we will show an example to display the values read via the serial port and then a sort of primitive warning system which will use the red LED and green LED to display a sort of warning or guidance on the temperature.
Parts List
You can get both of the required parts for about $12
| Name | Link |
| Arduino Uno | UNO R3 CH340G/ATmega328P, compatible for Arduino UNO |
| Rich Shield for Arduino | Rich Shield + IR Remote with Infrared Receiver LED Buzzer Button Light Sensor Temperature Sensor 24C02 EEPROM for Arduino UNO R3 |
Test Code
In this step we simply display readings via the serial monitor window. We will show the celsius, fahrenheit and humidity values. In the final example we will only use the celsius value. Also take note that the default adafruit example has another 2 values for heat index, we don’t use these in either code examples
You will need to download the adafruit DHT11 library and add it using the library manager
[codesyntax lang=”cpp”]
// Example testing sketch for various DHT humidity/temperature sensors
//this is the adafruit library
#include “DHT.h”
//this is the pin on the Rich shield
#define DHTPIN 12
#define DHTTYPE DHT11 // DHT 11
DHT dht(DHTPIN, DHTTYPE);
void setup()
{
Serial.begin(9600);
Serial.println(“DHTxx test!”);
dht.begin();
}
void loop()
{
// Wait a few seconds between measurements.
delay(2000);
// Sensor readings may also be up to 2 seconds
float h = dht.readHumidity();
// Read temperature as Celsius (the default)
float t = dht.readTemperature();
// Read temperature as Fahrenheit (isFahrenheit = true)
float f = dht.readTemperature(true);
// Check if any reads failed and exit early (to try again).
if (isnan(h) || isnan(t) || isnan(f))
{
Serial.println(“Failed to read from DHT sensor!”);
return;
}
Serial.print(“Humidity: “);
Serial.print(h);
Serial.print(” %\t”);
Serial.print(“Temperature: “);
Serial.print(t);
Serial.print(” *C “);
Serial.print(f);
Serial.println(” *F\t”);
}
[/codesyntax]
You should see something like this in the serial monitor window
DHTxx test!
Humidity: 47.00 % Temperature: 24.00 *C 75.20 *F
Humidity: 47.00 % Temperature: 24.00 *C 75.20 *F
Humidity: 47.00 % Temperature: 24.00 *C 75.20 *F
Complete Example
Now we need to implement the complete example
If the temperature is in the safe range we will switch the red LED off and green LED on. If the temperature is above the trigger value we then switch the green LED off and the RED led on.
[codesyntax lang=”cpp”]
// Example testing sketch for various DHT humidity/temperature sensors
#include “DHT.h”
#define DHTPIN 12 // what digital pin we’re connected to
#define DHTTYPE DHT11 // DHT 11
DHT dht(DHTPIN, DHTTYPE);
int redPin = 4;
int greenPin = 5;
void setup()
{
Serial.begin(9600);
Serial.println(“DHTxx test!”);
dht.begin();
pinMode(greenPin, OUTPUT);
pinMode(redPin, OUTPUT);
}
void loop()
{
// Wait a few seconds between measurements.
delay(2000);
// Read temperature as Celsius (the default)
float t = dht.readTemperature();
// Check if any reads failed and exit early (to try again).
if (isnan(t))
{
Serial.println(“Failed to read from DHT sensor!”);
return;
}
//if temperature is greater or equal to 27 celsius
//switch on red led and green led off
if(t >= 27)
{
digitalWrite(greenPin, LOW);
digitalWrite(redPin, HIGH);
}
else
{
digitalWrite(greenPin, HIGH);
digitalWrite(redPin, LOW);
}
Serial.print(“Temperature: “);
Serial.print(t);
Serial.println(” *C “);
}
[/codesyntax]
Future Projects
OK, how about taking this further
You can include a warning using the yellow LED, see if you can figure that one out.
How about using the buzzer for an audible warning system